Chicken Tortilla Soup

Share

The inspiration for this recipe came from my girlfriend and fellow basketball Mom, Mary Beth. We were chatting it up at our second home, also known as the gym, while we waited for our guys to finish basketball practice. Most days we head straight to the gym, once our guys get home from school, and dinner needs to be planned ahead of time. On this particular day I missed that boat and was trying to figure out what to do for dinner after practice. MB mentioned she had made chicken tortilla soup in the crock pot. My interest was immediately piqued because I LOVE Mexican food. She laughed when I asked her for the recipe because she said it was as simple as opening up cans and dumping everything into the crock pot. She’s always telling me that my recipes are too complex and that she is NOT a cook. However, after making this soup, I beg to differ with her and you will too! She IS a cook! I only ‘Kimmie-fied’ her original recipe a little bit. I hope you will give this one a try. It is SO easy to make and is FULL of flavor! It’s even better the second day!

You will need:

3 boneless, skinless chicken breasts

3 T of my taco seasoning mix (find the recipe, ‘No more store bought spice packets’ under the Tips tab)

1 jar of your favorite salsa (15 1/2 – 24 oz)

32 oz box of chicken stock (add up to 2 boxes if you like it more liquidy)

1 1/2 cups of frozen corn

15 oz can of black beans

15oz can of crushed tomatoes

3T of tomato paste

2 cups of cooked white rice (you can omit, but I had cooked rice in the fridge I didn’t want to throw out and it was a great addition)

the juice of a lime

grated cheese

cubed avocado

sour cream

your favorite tortilla strips/chips or fry up your own using corn tortillas and vegetable oil

fresh cilantro, chopped

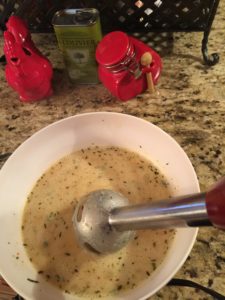
Place the chicken breasts in a large crock pot and sprinkle with the taco seasoning. Add the salsa, chicken stock, corn, beans, tomato paste and crushed tomatoes. Place the lid on the pot and cook on high for 4-5 hours or on low for 8 hours. Add the rice to the pot when there are 30 minutes left of cooking time.

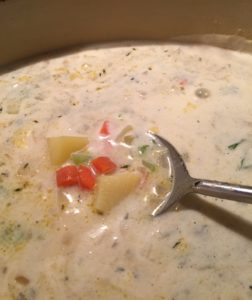
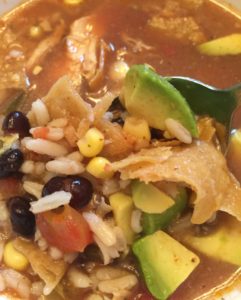
Shred the chicken with two forks. Add the lime juice and additional salt if needed. Stir and serve alone or top with cheese, avocado, sour cream, tortilla strips and cilantro.

#yumola


Fried Okra

Share

Fried Okra …. where do I begin? Delicious nuggets of lightly battered scrumpdilociousness! Truly! If you are like me and not a fan of the slimy version of okra that is typically found floating in southern staples like baby lima beans or crowder peas, have no fear. This AIN’T that! Some people prefer to dip the okra in a heavier batter and deep fry them in a lot of oil. That is typically the version you will find in most restaurants. Those are good, but I prefer the version my Dad always made … this version … a light coating and pan frying. They are delicious served as an appetizer with a spicy remoulade or alongside some fried green tomatoes (recipe coming soon) and buttermilk biscuits. Give them a try! You will NOT be disappointed.

You will need:

2 pounds of fresh okra, sliced about 1/2 inch thick OR frozen, cut okra

1 cup of all purpose flour

1/2 cup of corn meal

1 tablespoon of my spice blend (recipe below) or your favorite blend of spices

1/2 cup of buttermilk

1/2 cup of oil or enough oil to fill your pan 1/2 way up the sides

Heat the oil in a large cast iron skillet or dutch oven over medium high heat. If you have a thermometer, heat to 350 degrees.

In a bowl, combine the flour, cornmeal and seasoning. Place the buttermilk in a separate bowl and dip the okra into the buttermilk then dredge in the flour mixture. Coat well. Add the okra, in batches, to the hot oil and cook until golden brown. Remove and drain on paper towels.

Spice Blend

2 T paprika

2 T salt

2 T garlic powder

1 T freshly ground black pepper

1 T onion powder

1 T cayenne

Mix all of the spices together and store in an air tight container.

#yumola


Kimmie Bee’s 4th of July Sandwich

Share

I started making these sandwiches, years ago, to take to our church’s annual celebration on the 4th of July weekend and rarely make them any other time of the year. I always take extra, because I think the word is out about these scrumpdilocious sandwiches, and someone always happens to stop by our spot on the hill just as the sandwiches are being served. I’ve even been known to call the people, who I know will end up on my blanket, for their special order … no cheese or no onion or ham only. So, when one of my very best friends called me and said, “Kimmie, tell me everything you put on your 4th of July sandwiches. They are SO yummy and I want to make them for my sisters.”, we both laughed. I’d never thought about naming them. Patty, you get credit for this one, my beautiful sister.

The key to these sandwiches is the quality of ingredients. Trust me! I buy Applegate Organic deli products from Whole Foods. FYI: They have $2 off all of their deli meats and cheeses on Sunday. You’re welcome. And, the bread that I use for these sandwiches is KEY! This is probably the only time of year that I buy the La Brea Bakery Torta rolls from Costco because I would eat them ALL myself. SO GOOD! You will find them on the tables in front of the bakery. They will NOT be Kimmie Bee’s 4th of July sandwiches without this bread! Okay, I suppose you could use ciabatta rolls or your favorite bread, but … yah … get the bread from Costco.

You will need:

torta rolls

turkey (I prefer oven roasted)

ham (I prefer black forest)

salami

sharp cheddar cheese

havarti cheese

tomato, sliced (I prefer beefsteak or heirloom)

baby greens or baby romaine lettuce

red onion, sliced

mayonaise

extra virgin olive oil

balsamic vinegar

oregano or Italian seasoning

freshly ground black pepper

To assemble the sandwiches, put your desired amount of mayo on each half of the bread. Sprinkle each half with oregano or Italian seasoning. Then, add lettuce, ham, cheddar and turkey on one half and havarti, salami, tomato and onion on the other half. Notice, I didn’t specify amounts. If you like turkey more than ham, put more of that. Don’t care much for onion? Omit it. I add one slice of turkey and ham and two to three slices of salami; one slice of each cheese and two slices of tomato. We happen to like all of the ingredients, but … you get the idea. Drizzle both halves with olive oil, balsamic and pepper.  Carefully place one half on top of the other and get ready to have a party …. fireworks … in your mouth.

#yumola


Easy Corn Cakes

Share

Occasionally, I like to make these corn cakes instead of baking cornbread. They take a fraction of the time to cook. And, let’s face it, sometimes you just need to get dinner on the table. QUICKLY. You won’t sacrifice one bit of taste. In fact, my Mom and son prefer these little cakes. You can add in cheese, chilis, corn or whatever your heart desires. They are crispy on the outside and light and fluffy on the inside.

You will need:

3/4 cup of ground cornmeal (I prefer yellow)

1 1/4 cup of all purpose flour

2 teaspoons of baking powder

1/2 teaspoon of salt

3/4 cup of milk

4 tablespoons of honey (can use 1/4 cup of sugar instead)

1/4 cup of butter, melted

1 large egg, beaten

butter for the griddle

In a large bowl, combine the flour, cornmeal, baking powder and salt. Mix well. Add the milk, honey, melted butter and the egg. Mix until just blended.

Heat a griddle or pan over medium high heat and add a pat of butter. Pour 1/4 cup of the batter onto the griddle for each cake. Cook two minutes per side or until golden brown and cooked through.

#yumola

Chicken and Wild Rice Soup

Share

This soup is, hands down, my husband’s favorite. It’s hearty and DELICIOUS! And, it is SO easy to make. No, really, it is. You do need to chop a few ingredients, but it can be on your table … start to finish … in less than an hour. I promise! I always double this recipe because it’s even better the next day. Serve it alone or with cornbread, corn cakes or crusty bread.

You will need:

2 boneless, skinless chicken breasts (cut in 1/2 lengthwise and cubed)

1 cup of carrots sliced or cubed

1 cup of celery chopped

1 large onion chopped

1/2 cup of flour (you can omit and it will still be just as yummy)

1 tsp of freshly ground black pepper

1 tsp kosher salt

1 tsp of dried thyme

grape seed oil

6 cups of chicken stock

3 cups of half and half

1 box of long grain and wild rice (I like Whole Food’s 365 brand)

Heat a heavy Dutch Oven or large stock pot on medium high heat and add about one tablespoon of grape seed oil. Season the chicken with salt and pepper and saute in the oil until no longer pink. Add all of the veggies and the thyme. Saute for three to five minutes.

Add a little more oil if the pan is dry and whisk in the flour. Cook for one to two minutes to cook the flour. Add in the rice, seasoning packet and broth. Stir and bring to a boil. Reduce the heat to a simmer, cover and cook for twenty minutes. Whisk in the cream, taste and add additional salt and pepper if needed. Heat for another five minutes and ENJOY!

#yumola

Beef with Broccoli

Share

Everyone who knows me knows I love Mexican food. The flavor profiles make my tastebuds sing. I’m also a fan of Chinese, Thai and most Asian inspired foods. However, I’ve only found a few restaurants that satisfy my tastebuds AND agree with my stomach. Anyone else? In other words, I’m PICKY! And, I like to control the quality of ingredients I consume. This beef with broccoli recipe satisfies all of the above! I hope you will give it a try.

You will need:

1 1/2 pounds of flank or round steak cut into thin strips

1/4 cup of cornstarch (can use arrowroot powder)

1/2 cup of soy sauce (I use coconut aminos)

2 T brown sugar

2-3 cloves of garlic, minced

1 T of fresh ginger, minced

peanut oil (can use coconut or vegetable oil)

1 lb of broccoli florets

1/4 cup of beef broth

1/4 cup of oyster sauce

In a bowl, mix together the soy sauce, corn starch, brown sugar, ginger and garlic. Pour half of the mixture over the meat in a separate bowl and toss to coat. Reserve the other half of the soy sauce mixture. Let the meat sit while you prep the veggies.

Heat about three tablespoons of oil, in a wok or large frying pan, and add the broccoli. Stir for one minute and then remove it onto a plate.

Allow the pan to get very hot again (medium high heat) and add a drizzle of oil. Using tongs, carefully add the meat to the pan. Let it cook, untouched, for one minute, then turn and cook for another minute. Remove onto a separate plate.

Pour the remaining sauce into the skillet with the beef broth and oyster sauce. Cook on high until it starts to thicken. Add the beef and broccoli and toss. Serve alone or over rice.

#yumola

Cauliflower Fried Rice

Share

I was a not a member of the ‘riced cauliflower fan club’. In fact, I’m not even a fan of cauliflower in any form. But, in my effort to eat healthier, I decided to give it a try. I was pleasantly surprised. Okay, that’s an understatement. I was blown away! And, my non veggie loving son didn’t even realize it wasn’t rice. Winning!!!

You will need:

coconut oil (can use grape seed oil)

2 large eggs, beaten

6 green onion, chopped (white & green)

3 cloves of garlic, minced

1 T of fresh ginger, finely chopped

1 package of frozen riced cauliflower

4 T of soy sauce (I use coconut aminos)

1/4 t red pepper flakes

1 large carrot chopped

1 cup of snap peas chopped

1 t rice vinegar

1 t sesame oil

Heat two teaspoons of oil in a large nonstick skillet or wok over medium heat. Add the eggs and scramble until the eggs are cooked. Transfer the eggs to a small plate and set aside. Wipe the pan clean and turn the heat up to medium high. Add three tablespoons of oil to the pan and add the carrots, green onion, garlic, and ginger. Cook, stirring often, until softened. Add the grated cauliflower & peas. Cook for 1 minute. Add the soy sauce and red pepper flakes. Cook, stirring often, until the cauliflower “rice” is tender. Stir in the rice vinegar, sesame oil and eggs.

#yumola

Kimmie Bee’s Spaghetti Squash

Share

Are you looking for a healthy meal that is not bland, boring and void of flavor? Or, just looking for something new to add to your menu? Have you given up pasta? Are you a vegetarian? This recipe is for YOU! Even meat and pasta eaters will gobble this one up. I won’t tell you that spaghetti squash tastes just like pasta. It does not. But, I promise, you will not wish you were eating pasta. So healthy and SO GOOD! Feel free to add, or substitute with, your favorite veggies. Most of my recipes are created with what happens to be in my pantry and refrigerator. This combination is DELICIOUS, but the variations are endless and limited by only your imagination and tastebuds.

You will need:

1 large spaghetti squash (serves 2 – 3 hefty servings)

8-10 stalks of asparagus, ends trimmed & roughly chopped (could use frozen)

1 package of mushrooms (portobello or a mix of your faves), sliced

2 shallots, roughly chopped (or 1 small onion)

1/2 cup of sun dried tomatoes in olive oil, chopped

2 -3 cloves of garlic, minced

olive oil

kosher salt

freshly ground black pepper

1 tsp of red pepper flakes (more if you like a little more kick)

1/2 teaspoon of oregano (could use Italian seasoning)

1 small can of crushed tomatoes

Preheat the oven to 350 degrees

Cut the squash in half, lengthwise, scoop out the seeds and stringy stuff. Drizzle with olive oil (approximately one tablespoon) and 1/4 to 1/2 teaspoon of salt and pepper. Place the squash, cut side down, on a wire rack in a baking sheet and bake for 35-40 minutes or until a knife goes into the squash easily. The wire rack will allow the squash to be raised, a bit, and any liquid will drain away from the squash. Remove and set the squash aside until it is cool enough to handle. With a fork, scrape the flesh to create long strands. They will resemble angel hair pasta.

While the squash is baking, heat a saute pan over medium high heat. Add one tablespoon of olive oil, the asparagus, mushrooms, onion and sun dried tomatoes. Cook for 5 minutes. Add the garlic, oregano and cook for another minute before adding the crushed tomatoes. Simmer for five to ten minutes. Season with salt and pepper to taste and serve over the spaghetti squash. Top with grated parmesan if you’d like.

#yumola

Mouth Watering Pot Roast

Share

Are you are looking for a simple, yet absolutely DELICIOUS, pot roast recipe? Look no further! This pot roast turns out perfectly EVERY SINGLE TIME. No, really. I guarantee it. It is fork tender and literally melts in your mouth. And, it’s even better the next day! But, if you don’t have a dutch oven, please do yourself a favor and get one.  NOW! I use mine all of the time and it is especially good for this recipe.

You will need:

3-5 pound roast of your choice (bottom round, chuck, rump roast)

kosher salt

freshly ground black pepper

paprika

2 tablespoons of olive oil

3 tablespoons of unsalted butter

2 onions, peeled and halved

6 whole carrots, peeled and sliced (doesn’t have to be precise)

1 cup red wine (one you would drink .. NOT cooking wine)

2-3 cups beef broth or stock

2 sprigs fresh rosemary or 1 tsp dried

2 or 3 sprigs fresh thyme or 1 tsp dried

3 whole cloves of garlic, peeled

Preheat the oven to 275F.
Generously sprinkle the roast with the kosher salt, black pepper and smoked paprika. GENEROUSLY. And, all over the roast. Don’t skimp here. Heat the olive oil and butter, in a dutch oven, over medium-high heat. Place the halved onions into the pot and brown them on both sides. Remove them from the pan and put them on a large plate. Add the carrots into the pot and cook them until slightly browned. Remove them and place them with the onions. If needed, add a bit more olive oil to the pot and add the roast. Don’t touch it until you get a nice sear (approximately 2 minutes). Turn and repeat until all sides are seared/browned. Remove the meat from the pan and place it with the onions and carrots.

With the heat still on medium-high, slowly pour the wine into the pot. Scrape the browned bits from the bottom of the pan while the wine boils for one minute. Turn off the heat. Place the meat back into the pot and top with the onions and carrots. Add the herbs and garlic and enough beef broth/stock to cover the meat halfway.

Put the lid on the pot and place it into the oven for 3 – 4 hours or until the roast is fork tender.

For the gravy, remove the cooked roast from the pot and place on a board. Remove the sprigs of rosemary and thyme (if you used fresh herbs). If you have an immersion blender, blend the contents of the pot until smooth. You may have some larger pieces of onion or carrot that are more difficult to blend with an immersion blender. You can remove those. If you don’t have an immersion blender, you can put the contents of the pot into a regular blender. But, be careful because it will be hot. If the gravy is a little on the thin side, combine 2 tablespoons of corn starch or flour with two tablespoons of cold water then pour the mixture into the gravy. Bring the gravy to a boil and then simmer until the desired thickness is reached. Season with additional salt and pepper if needed.

Once the roast has cooled enough for you to handle it, thinly slice it across the grain and place on a platter. Serve with your favorite sides and the gravy.

#yumola

Kimmie Bee’s Creamy Chicken and Vegetable Soup

Share

I took out boneless skinless chicken breasts for dinner tonight, but needed to stop at the store to get a few things to complete the meal I had planned on making. However, after going to the UPS store and taking my son to basketball shooting practice in the FRIGID temps, all I wanted to do was get HOME! I knew I’d have to brave the weather, later, to take him back out to basketball practice. So, stopping at the store just wasn’t happening. Besides, I figured I could come up with something for dinner using whatever I already had at home. And, boy, did I ever! I looked in my fridge and pantry and decided SOUP it is! You can modify this recipe to suit your tastes … sub coconut milk for regular milk; use vegetable broth instead of chicken broth and even omit the chicken altogether. But, if you follow it to the letter, I GUARANTEE you, you will not be disappointed. It is so hearty and delicious! Yumola, even!

You will need:

2 – 3 boneless, skinless chicken breasts

1 T grape seed oil or your oil of choice

kosher salt

freshly ground black pepper

1/2 stick of butter

4 carrots, scrubbed & diced (peel if you like)

3 stalks of celery, diced

1 medium onion, diced

1 1/2 t dried thyme

1/2 c of flour

6 cups of chicken broth

2 cups of milk

4 – 6 potatoes, peeled and cubed

2 cups of sharp cheddar cheese, shredded

Season the chicken on both sides with salt and pepper. Heat a large dutch oven or stock pot on medium high heat and add the oil. Add the chicken and cook on one side for 3-5 minutes. Turn the chicken, turn the heat to medium low, cover and cook for 5-10 minutes or until done and no longer pink. Remove the chicken to a cutting board and set aside.

In the same pot, add the butter, carrots, celery and onion. Cook, on medium heat, for 3-5 minutes until tender. Stir in the thyme and cook for 1 minute. Whisk in the flour and cook for 1 minute. Gradually add the chicken broth and milk and whisk constantly for 3 minutes. Add the potatoes and bring the pot to a boil. Reduce the heat to low and simmer until the potatoes are tender (around 15 minutes).


While the soup is simmering, dice the chicken. Once the potatoes are tender, remove about 2 cups of the soup and place it into a blender or a bowl and use an immersion blender to puree. You can skip this step, but it gives the soup body and a creamier consistency.

Add the puree back into the pot and stir in the diced chicken and cheddar cheese. Season with salt and pepper to taste. You can omit the cheese, if you’d like, and it will still be delicious, but the cheese makes it OUT OF THIS world good.

#yumola