Kimmie Bee’s Summer Corn Chowder

Share

This corn chowder recipe is my spin on a ‘Summer corn chowder’ I had in a restaurant. It was really good, but I felt it was a little too thin and needed to be more flavorful. I love recreating recipes at home because I know exactly what is going in them; can control the quality of ingredients (I try to use organic as much as possible) and can tweak them to cater to my/our taste buds. I hope you will give this chowder a try. It’s extra scrumpdiliocious with a grilled cheese sandwich!

3 potatoes, cubed

1 red bell pepper, chopped

1 green bell pepper, chopped

1 medium onion, chopped

1 stalk of celery; tops included, chopped

3 T unsalted butter

2 T grape seed oil

3 T flour

5 cups of chicken stock (I prefer making my own, but there are some great store bought stocks. You could substitute with vegetable stock as well)

4 cups of fresh corn, cut off the cob OR frozen corn

1 cup of heavy cream

1/4 t of poultry seasoning

pinch of cayenne pepper

salt & freshly ground pepper to taste

fresh basil, rolled and cut into strips (chiffonade) or if you really want to take it to THE NEXT level … homemade bacon crumbles to garnish (shown in the picture below with a grilled cheese sandwich)
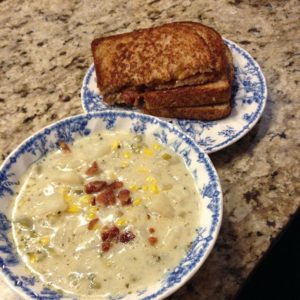
cornchowder

Heat the butter and grape seed oil in a heavy stock pot or dutch oven. Add the onion, celery, peppers, 1/2 teaspoon of salt and pepper and cook for 5 minutes over medium heat. Sprinkle the flour over this mixture and cook for 3 minutes while stirring. Add the stock and potatoes and bring to a boil. Reduce the heat to a simmer, cover and cook until the potatoes are tender. Add the corn, seasonings and cream. Continue to simmer, uncovered, for 5-10 minutes until the soup thickens. For a creamier consistency, remove one cup of the soup and puree with an immersion blender (or traditional blender) then return to the pot. Garnish with the basil or bacon crumbles.

#yumola

Kimmie Bee’s Greek Salad

Share

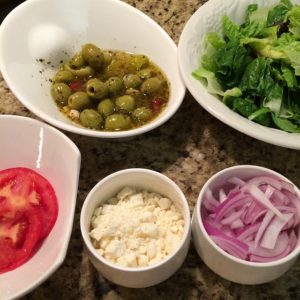
This salad is a FAVE at my house!  Even my picky and, often times, NON veggie eating son likes it.  It doesn’t require a lot of cooking and is PACKED full of flavor! It is a ‘build your own Greek salad’, so you can put in as much or, in my son’s case, as little of any ingredient you like.  And, there are no exact amounts in this salad (2 cups of this or that).  Just put each ingredient in a separate bowl and allow each person to make their own salad.

greeksalad

romaine lettuce or mixed baby greens

red onion, sliced

tomato, sliced

feta cheese, crumbled

mixed kalamata olives

4-6 boneless; skinless chicken breasts

3 cloves of fresh garlic, minced

2 teaspoons of dried oregano

kosher salt & freshly ground black pepper to taste

1 lemon

olive oil

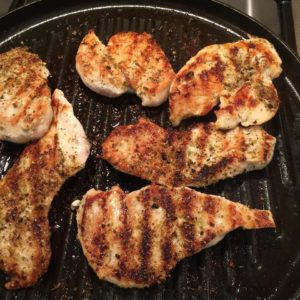
Season the chicken with the garlic, oregano, salt & pepper (approx 1 teaspoon each); drizzle with olive oil and cook on a grill pan or outdoor grill approximately 4 minutes per side.  Remove and immediately squeeze the juice from 1/2 of the lemon onto the chicken and allow to rest for 5 minutes.  Slice diagonally.

chickenbreastsforgreeksalad

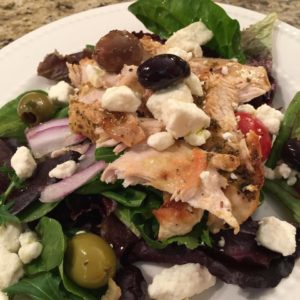
Assemble individual salads and top with the grilled chicken.  Drizzle with olive oil and a squeeze of lemon.  NO other dressing is needed.  Your mouth is going to be HAPPY!!!!!!! And, your tummy will be too.

build-your-ownGreekSalad

#yumola

Kimmie Bee’s Roasted Garlic & Rosemary Chicken Breasts

Share

4 whole chicken breasts that have been brined (4 hours) in 1/2 gallon of water and 1/4 cup of kosher salt, rinsed and thoroughly patted dry. ( see my note on brining under the “Tips” link)

olive oil

4 sprigs of fresh rosemary

4-6 cloves of garlic minced

1 T dried rosemary

kosher salt and freshly ground pepper to taste

1/2 lemon

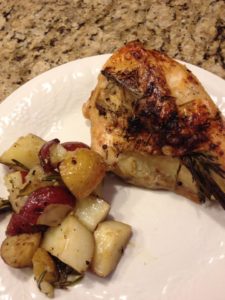
Preheat oven to 350 degrees. Make a slit between the skin and the flesh of the chicken breast and put 1 spring of rosemary underneath the skin of each breast. Then, rub the olive oil all over the chicken. Sprinkle salt and pepper, liberally, all over the chicken. Do the same with the dried rosemary and minced garlic. Place on a baking sheet; skin side down and cook for 15 minutes. Turn the chicken and cook an additional 20-30 min or until the juices run clear and the internal temperature is 165 degrees. Remove from the oven; squeeze the juice of the lemon over the chicken; cover loosely with foil and let rest for 10 minutes before serving.  This chicken is awesome paired with my roasted potatoes. Check out the recipe under the ‘Side Dishes’ link.

1385439_10151777539004790_702999404_n

#yumola

Kimmie Bee’s Fried Chicken & French Toast

Share

Kimmie Bee’s Fried Chicken

1 whole fryer, cut in pieces (or your favorite pieces i.e. boneless; wings, etc.) that has been brined and patted dry.

1-4 T of your favorite spices (i.e. salt, pepper, garlic powder, paprika, cayenne, thyme)

1/4 cup of hot sauce

2 cups of all purpose flour

peanut oil (my fave) or your oil of choice

buttermilk (enough to cover chicken)

1-2 eggs

Note:  To save time and since you are marinating the chicken in buttermilk, you can skip the brining process in this recipe if you’d like. But if you don’t use the buttermilk, brine so that your chicken isn’t dry.

Place the chicken in a bowl and cover with the buttermilk and hot sauce. Cover and refrigerate for at least 4 hours. Remove chicken and discard marinade. Season chicken with 1-2 tablespoons of the spices. Put flour in a separate bowl or zip lock bag. Season flour with 1-2 tablespoons of the spices. In a separate bowl, whisk the eggs with 3 tablespoons of water. Dredge the chicken in the flour, then into the egg wash and back into the flour. Set on a plate or platter while you prep the pan.

Heat oil (enough to come half way up the pan) on medium high. My FAVORITE pan to use is my Mom’s cast iron skillet. I use it for many things … cornbread; frying chicken & fish as well as roasting a whole chicken. Fry the chicken for approximately 8-12 minutes; turning once until golden brown. Bone in chicken will take longer than boneless; skinless.

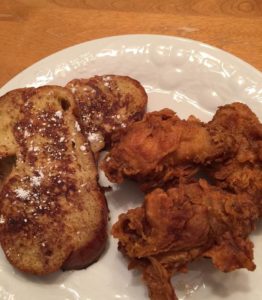
I love serving this fried chicken with my homemade French toast. My twist on Chicken and Waffles. Initially, I was just improvising because I don’t own a waffle iron.  Gasp! But, we actually prefer it over waffles. It is one of my son’s favorite meals!

12294705_10153678378394790_8587910742594073036_n

Kimmie Bee’s French Toast

8 slices of Brioche or Challah bread sliced thick

1/2 t of vanilla extract

1/4 t of ground nutmeg

1 t of cinnamon

2 T sugar

4 eggs

1/4 c milk

butter (unsalted)

powdered sugar

maple syrup

Combine the spices in a small bowl. In a separate bowl, whisk the milk, eggs and vanilla. Add the spices to the egg mixture and then pour into a shallow dish. Dip the bread into the egg mixture and cook in a heated; buttered pan or griddle until brown on both sides. Remove and sprinkle with powdered sugar. Serve with maple syrup or your favorite toppings.

#yumola

Yumola BLT Sandwich

Share

One of my favorite sandwiches is the BLT. I think I like it so much because my Dad loved a good BLT and I have yet to taste one that rivals his. Simple? Yes. But, even the simplest things can be delicious. It’s all about the quality of ingredients you use.

While on a business trip, close to my parents’ home, I opted to stay with them instead of a hotel. One of the best decisions EVER. It provided me with an opportunity to spend some quality; uninterrupted and ALL TO MYSELF morning time (Sorry, not sorry to my siblings ☺️) with my Dad. During that trip, he would get up every morning and make me breakfast. On some of those mornings … okay, maybe almost EVERY morning, he made me a BLT. He was a great cook and he loved bacon and tomatoes. So, it was only fitting that he made THE BEST EVER BLT’s. They always included non cured; thick slab bacon (he was ahead of his time on the organic, no nitrate, etc. thingy) and ALWAYS garden tomatoes (usually heirloom or beefsteak and often straight out of his own garden). So, this sandwich is in honor of my Daddy. Want to make it extra scrumpdiliocious? Add ripe avocado slices. Or, even better? Fried green tomato slices. (Stay tuned for the fried green tomato recipe later.)

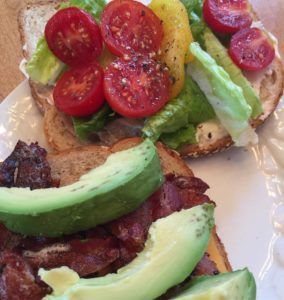
13754417_10153938907089790_5820961014114597223_n

To make this yumola sandwich, you will need:

4-6 slices of thick cut; uncured bacon or uncured turkey bacon cooked until crispy

country white, ciabatta or your favorite wheat bread (bake your own or get from a bakery that uses quality ingredients. Whole Foods has a great selection of breads)

beefsteak, campari or heirloom tomato sliced & seasoned with kosher salt and freshly ground black pepper

butter lettuce, green leaf or romaine lettuce (but PLEASE no iceberg 😩)

1 Tablespoon of mayonnaise (your favorite brand or my favorite … homemade ☺️)

1/4 of a ripe avocado; sliced

Toast your bread and then assemble the sandwich. Start by putting the mayo on each slice of bread. Next, layer the lettuce & tomato on one slice. On the other slice, layer the bacon and avocado. Carefully place one half on top of the other and get ready to have a party in your mouth!

#yumola

Kimmie Bee’s Pasta Sauce

Share

This pasta sauce was created out of pure frustration and my trying to figure out a way to get some vegetables into my 5 year old son who wanted NOTHING to do with them. He loved (and still does) pasta and would request butter or plain tomato sauce … ONLY! So, I figured if I could somehow mask the vegetables in a sauce, I could trick him. Guess what? It worked! And, even though he’s almost 13 now and not such a picky eater any longer, this is still one of his favorite sauces. We all like it. I hope you can fool your picky eater as well. This recipe can be made with or without meat. We happen to really like it with ground turkey, but ground beef or no meat at all is just as delicious.

Kimmie Bee’s ‘fool even the pickiest eater’ Pasta Sauce

1 1b of ground turkey

2 carrots, sliced (you don’t have to be precise because you will be blending them)

1 stalk of celery, chopped (tops included … that’s where ALL the flavor is)

1 onion, chopped

1 green, red & yellow bell pepper, chopped

3-5 cloves of garlic, chopped or minced

1 8 oz pkg of baby portobello mushrooms, sliced

1/4 cup of fresh basil, chopped

1 small jar of sun dried tomatoes packed in olive oil, chopped

2 tsp of dried oregano

2 tsp of dried thyme

2 tsp of red pepper flakes (adjust to your tastebuds or omit altogether)

kosher salt and freshly ground black pepper to taste (approx. 1 tsp each)

oil to coat the pan

1 – 28oz can of crushed tomatoes

1- 14.5oz can of tomato sauce

1 small can of tomato paste

1/2 cup of freshly grated parmesan cheese

Sauté the ground turkey in a drizzle of oil on medium high heat until browned. Remove and set aside. In the same pan, drizzle a little more oil and add the carrots, celery onion, peppers, mushrooms and sun dried tomatoes. Cook on medium high heat for 5 minutes. Add the garlic and cook for 30 seconds. You don’t want the garlic to brown. Add the tomato paste and cook; while stirring for 2 minutes. Add the basil, salt, pepper, oregano, thyme & red pepper flakes and stir. Place the veggie mixture into a blender and puree until smooth. Return to the pan and add the crushed red tomatoes, tomato sauce and the ground turkey. Simmer for at least 1 hour; stirring frequently. You can add pasta water during cooking if the sauce needs to be thinned out. Just before serving, add the cheese, stir and serve over your favorite pasta.

If you own an immersion blender, add the crushed tomatoes & tomato sauce to the pot of sautéed veggies and then blend with the immersion blender. Then, add the ground turkey and simmer. And, remember, you can use ground beef; make homemade meatballs (recipe coming soon) or omit the meat altogether.

#yumola

Kimmie Bee’s Bruschetta

Share

This is a crowd pleaser! Whenever I host a party, my friends ask if I will be making my bruschetta.  Okay, who am I fooling? They INSIST that I make my bruschetta!

For this recipe, you will need:

6 roma tomatoes, chopped

1/2 cup sun dried tomatoes in olive oil, chopped

3 cloves of garlic, minced

4 T olive oil

2 T balsamic vinegar

1/4 cup fresh basil

salt & pepper to taste

2 cups shredded fresh mozzarella

1 french baguette, sliced about 3/4″ thick

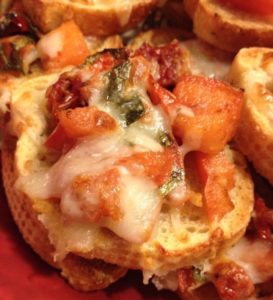
FullSizeRender

In a large bowl, combine tomatoes, sun dried tomatoes, garlic, olive oil, vinegar, basil, salt and pepper. Allow to sit at least 10 minutes so that the flavors can marry. Arrange bread on a cookie sheet and broil for 1-2 minutes. Remove from the oven and divide the tomato mixture evenly amongst the bread slices. Top with the cheese and broil until the cheese is melted. Remove and serve hot or at room temperature.

#yumola

Kimmie Bee’s Guacamole

Share

So, let me just say that I LOVE guacamole and typically rate restaurants by their chips, salsa and guac. If you can’t get those three right, in my opinion, not much else is going to be done right on the menu. Often times, I find myself ‘tweaking’ the salsa and guacamole after it’s been delivered to the table … a squeeze of lime; a dash of salt and a teaspoon of hot sauce. My girlfriend, Patty, has even been known to carry spices in her purse for this very reason. And, I’ve been known to pick up my favorite chips and smuggle .. uh I mean carry them into a restaurant with awesome salsa and guac, but sub par chips.

This recipe came from my wanting to recreate a guacamole that was made, table side, at a Mexican restaurant many years ago. I really liked it, but thought it needed a little ‘tweaking’ to Kimmie-fy it.

What you will need for Kimmie Bee’s DELICIOUS guacamole

12 ripe avocados, mashed with a fork (Yes, TWELVE! You can cut the recipe in half if you want to, but you will wish you hadn’t! 😊)

2 tomatoes, blanched; skin removed & chopped

4 jalapeños, seeds and veins removed

1 bunch of green onion, chopped (you can include the whites, too)

the juice of 2 limes

the juice of 1/2 of an orange

6 cloves of garlic, minced

1 small red onion, chopped

a handful of cilantro, chopped  …. about 1/4 to a 1/2 of a cup

kosher salt and pepper to taste

Combine all of the ingredients in a bowl with a cover and lightly mix and refrigerate for at least 30 minutes.

#yumola

Kimmie Bee’s Stuffed Mushrooms

Share


Every time I see my handwritten notes on the page of this stuffed mushroom recipe, I think of my nephew Joshua. I, affectionately call him, “Teeny Man” and he lovingly calls me, “Auntie Mommy”. He is a grown man, now, with a beautiful wife. But, he will always be my Teeny Man. One of the memories this recipe brings to mind is the weekend I babysat Josh, and his 3 older siblings, so that my sister and brother-in-law could enjoy a weekend together on the west coast. Josh had an asthma attack that landed him in the hospital and me by his side, 24/7 (for a day and a 1/2), while my sister desperately tried to get a flight back home. When she finally arrived and I tried to leave the hospital room, for a much needed shower and BED, it took some coaxing and pleading for Joshua to allow me to leave. These mushrooms (and my Eggplant Parmesan … more like lasagna) are his FAVORITES.

1 package of baby portobello mushrooms (medium to large in size)

1 small bunch of green onions (green only), chopped

1 cup of freshly grated extra sharp cheddar cheese (I like to grate my own cheese .. fresher and you control what’s in it)

1/4 – 1/2 cup of homemade breadcrumbs seasoned with a 1/4 t of Italian seasoning, garlic powder, salt and pepper (or you can use good quality store bought Italian bread crumbs)

1 stick of unsalted butter

1 T of worcestershire sauce

1 dash of your favorite hot sauce

kosher salt and freshly ground black pepper to taste

Preheat the oven to 375 degrees.

Remove the stems from the mushrooms and chop finely. In a saute pan, melt the butter over medium heat. Add the chopped stems & green onion. Cook for 3 minutes. Remove from the heat and place the mixture into a bowl. Add the worcestershire, hot sauce, salt and pepper (about 1/2 teaspoon each) & the grated cheese. Then, add the breadcrumbs; starting with 1/4 cup. You want the mixture to be pretty dry because when you stuff and bake the mushroom caps, there will be some liquid created. You just want the stuffing to hold together, but not be wet.

Fill the mushroom caps with the stuffing and place them on a cookie sheet. Bake for 10-15 minutes or until the cheese is melted and the mushrooms are heated through.

Here’s a bonus *** If you have stuffing left over, use it to stuff boneless chicken breasts or pork chops. OH MY GOODNESS, it’s so good! Just make a slit in the meat, stuff with the mixture; season the outside with salt and pepper and sear (brown) both sides in a hot pan. Finish cooking in the oven, on 375 degrees, until the internal temp of your meat has reached 165.

#yumola

johs&julia

Joshua & Julia